How to Start a Website

I actually wrote at ProBlogit.com about starting and implementing a blog. It is almost similar to the topic how to start a Website if you just replace the word blog with Website. I will simplify it here but I will always be referring you to the blog entries that I wrote at ProBlogit.com especially if I find it not necessary to rewrite them as I definitely discuss things thoroughly there.

I would assume that you already have a business or a topic, your hobby perhaps, that is why you would like to have a Website.

But before everything else, allow me to use the word business here instead of hobby or any other terms.

1. Get a Domain Name

First, get a domain name for your business Website.

Your domain name should be the same with your business name. It is ideal if your business name has two syllables or three syllables. How would you know if your business name is still available as a domain name. Well, check if the domain name is still available by going to the domain registrar’s Website.

I always use GoDaddy to check if the domain name is still available. If your business name is no longer available as a domain name, find an alternative. Just keep on searching until you find one that is related to your business.

Once you find the right domain name for your business Website, register the domain name.

Read more about this topic, Domain Name or Free Subdomain Name, Choosing a good Domain Name and Registering a Domain Name, at ProBlogit.com. I discuss this topic thoroughly on those blog entries. You should not neglect this topic at all. It is very important. Your domain name is your online business identity.

2. Get a Web Host

Second, get a web host to host your domain name for your business Website to be online.

I have several web hosting providers and I have been using DreamHost to host several of my blogs and sites. I find DreamHost easy to use. I also tried Lunarpages and it was fine. I have not tried BlueHost though but when it comes to price BlueHost costs lesser than DreamHost.

It is not only because I am an affiliate of those web hosts that is why I include them here but because of the features of the web hosting they offer. Add to that, they have been around in the business of web hosting for quite some time now.

Read more about this topic, Choosing a Web Host, at ProBlogit.com. This topic is again very important. Even if you do not understand the terms that I wrote on that blog entry, they are very important for your business Website.

3. Set up the Website

Third, set up the Website to be available online.

Now, this is the very crucial part of starting a Website especially if you want to set it up yourself as it is a little bit more technical. Unless of course, you asked someone to do this for you.

After you have registered the domain name and after you opened a web hosting account, you need to set up your business Website. This process is needed so that your business Website will be available online. Without this process, there is no way to get your business Website online.

Read more about this topic, Setting Up a Blog, at ProBlogit.com.

But there are very important things regarding adding the domain name and setting the nameservers (DNS) which I failed to mention at the blog entry, Setting up a Blog, especially if you registered your domain name at GoDaddy and you would like DreamHost to host your business Website.

Add Domain Name

It is not enough that you opened a web hosting account. You need to add manually the domain name to be hosted.

If your account is at DreamHost, go to DreamHost Control Panel.

Go to DreamHost and login.

Click Website Hosting.

Click Add New Domain.

Supply the necessary details.

Examples:
Domain to host: domainname.com
Web directory: domainname.com

If you have no username yet, try to create one first. Go back to this page later and supply the necessary details again. Remember though that the username and password that are needed in adding a domain name should be different from your username and password when you accessed the control panel.

Then, click fully host this domain.

You will see the domain name if it is already listed once you click Manage Domains.

Set DNS (Domain Nameserver)

Make sure that the DNS of your domain name is pointing to your web host.

Go to your domain name registrar and login.

Click Manage Domains.

Click the domain name to be able to change the nameservers.

Click set Nameservers.

For example, the Dreamhost Nameservers are the following:

NS1.DREAMHOST.COM
NS2.DREAMHOST.COM
NS3.DREAMHOST.COM

Enter NS1.DREAMHOST.COM at the space corresponding to Nameserver 1

Enter NS2.DREAMHOST.COM at the space corresponding to Nameserver 2

Enter NS3.DREAMHOST.COM at the space corresponding to Nameserver 3

Nameserver 1 and Nameserver 2 are required and you will see that if there is an asterisk near it. An asterisk normally indicates that something is required.

You will have to wait 48-72 hours for the DNS to propagate though. I am not going to explain to you what is DNS propagation. It is important for you to know though that this process is needed.

You will know if the DNS has propagated once you see that your business Website is online.

But for you to know this and while waiting for the propagation, you create at least a simple page for your Website.

How to create a simple page?

Go to your web host or web hosting provider Website and login.

Let me illustrate this using DreamHost Control Panel.

Click Manage Domains.

Once you see the domain name, click WebFTP.

Another window will appear and supply the necessary details.

Example:
FTP server: domainname.com
Initial directory: domainname.com (same with Web directory at the Add Domain Name section)

If the DNS has not propagated yet, use your web server.

See what is Your Web Server by clicking Account Status on the top right side of the control panel and just add dreamhost.com to it with dot also before dreamhost like server.dreamhost.com.

Once you are inside the WebFTP, look for the index page, normally index.html or index.htm or index.php. It could also be default instead of index. Whatever text is inside that page, you will see that online later on once the DNS has propagated. But you can also change the text inside that page by editing it, by clicking edit, just follow the same instructions when creating a new file.

If you do not see any index or default page, create a new file.

Click New File.

Supply the file name, index.html or index.php at the box corresponding New file name.

You see [Enter Code Here].

Just delete everything and replace it with “Hello World” without the quotes.

Save it by clicking the floppy disk icon.

With that, once the DNS has propagated, you will see that text online on the page that you created.

To see the page, just type your domain name at the browser’s toolbar.

There are other technical things needed to be discussed but for the meantime the above instructions will suffice.

4. Get a Web Design

Fourth, get a web design for your business Website.

Part of starting a Website is for your business Website to have its own identity by having your own web design.

There are several ways in getting a web design.

You can hire a web designer to do a web design for your business Website.

You can make use of a ready made web design made available to you by your web hosting provider.

You can install WordPress and make use of its default theme.

If you install WordPress:

You can also use your own theme by hiring someone to design a theme for your business Website.

You can also make use of the WordPress themes made available to you by your web hosting provider.

You can also make use of the other WordPress themes which require uploading to WordPress.

But you might need the expertise of someone in installing WordPress if you do not know how to install the database.

I will write about this topic, how to install a database, later on.

5. Promote the Website

Fifth, promote your business Website.

Part again of starting a Website is for you to promote your Website.

It is not just enough that you have a Website. Your clients may know about it but if you need more clients, then your prospective clients must be able to find you if they search for a product like yours.

Read more about this topic, Ways on Promoting a Blog, at ProBlogit.com.

Well then, starting a Website would entail:

Getting a Domain Name

Getting a Web Host

Setting up the Website

Getting a Web Design

Promoting the Website

That’s it. I hope that what I explained here will help you in your endeavor starting and setting up your own Website.

Disclosure: As an affiliate, if you decide to register a domain name with GoDaddy, and get a web hosting account with either DreamHost, BlueHost or Lunarpages, I am going to earn from it.

Dreamhost,Web Design,Web Hosting,WordPress

Upgraded to WordPress 3.0.1

I was able to upgrade from WordPress 3.0 to WordPress 3.0.1 the twelve (12) sites and blogs yesterday without any problem, even the three (3) sites where I had some problem that I mentioned when I upgraded to WordPress 3.0 “Thelonious”.

Sofie Hofmann dot com
Sofie Estolloso Hofmann Designs International
Pro Blog it | ProBlogging Venture Tips and Ideas, Reviews and Opinions
ISYU.INFO Around the World
PANDAN.PH Pandan Antique Philippines
Weggis along Lake Lucerne Switzerland
PAGTATAP Foundation
Philippine Seafarers Assistance Programme
Leocadio Alonsagay Dioso Memorial Public Library

Tugbong Festival
Patria Diesel Power Plant Issue
Semirara Dumpsite Issue

I did not do anything at all to fix the problem with the three (3) sites, WordPress 3.0.1 fixed it by itself.

Before you upgrade, please do not forget to back up your database and your files.

Read this blog entry here on how to back up the database via phpMyAdmin and read this WordPress.org documentation, WordPress Backups, for more information.

Thank you very much WordPress Team!

WordPress

Upgraded to WordPress 3.0 “Thelonious”

I have upgraded the nine (9) sites and blogs below out of the twelve (12) sites that I am maintaining up to now. I had no problem upgrading the nine (9) sites and blogs from WordPress 2.9.2 to WordPress 3.0 “Thelonious” but have a serious problem now with the three (3) remaining sites.

Sofie Hofmann dot com
Sofie Estolloso Hofmann Designs International
Pro Blog it | ProBlogging Venture Tips and Ideas, Reviews and Opinions
ISYU.INFO Around the World
PANDAN.PH Pandan Antique Philippines
Weggis along Lake Lucerne Switzerland
PAGTATAP Foundation
Philippine Seafarers Assistance Programme
Leocadio Alonsagay Dioso Memorial Public Library

These three (3) remaining sites are using a period at the Category section under Permalinks instead of the category word itself or any word for that matter. I used the Posts feature instead of the Pages feature to create pages in these sites for dynamic pages purposes. But now, WordPress 3.0 does not recognize the redirection.

I have no problem using the words archives and category to replace the period in other sites. But in these three (3) sites, I just cannot find the right term to replace the period as the pages appear as pages not posts and without any category.

Tugbong Festival
Patria Diesel Power Plant Issue
Semirara Dumpsite Issue

I experimented converting the Photo Gallery category and posts at the Patria Diesel Power Plant Issue site into pages leaving the News Updates, the only category that would remain as the other pages have been created using Pages feature, and it worked fine. But I am not sure if I am really going to implement it.

But the pages at the Semirara Dumpsite Issue and the Tugbong Festival sites were created using the Posts feature. I do not want to convert the pages yet using the Posts feature now into pages using the Pages feature. It would be a lot of work as there are a lot pages to convert. But it seems like, I have to do it sooner or later. I just do not feel like using another word between the domain name and the pages. But I hope to be able to find a better solution.

WordPress is such a good publishing platform but sometimes it is also giving me a hard time because of some inconsistencies like this one now.

Nevertheless, WordPress 3.0 “Thelonious” is such a good release. Please watch the video if you would like to know more about WordPress 3.0.

https://videopress.com/v/wp-content/plugins/video/flvplayer.swf?ver=1.21

Thank you, WordPress Team!

By the way, I have not neglected this site. I was on vacation and I normally do not blog when I am on vacation.

Keep on reading! Thank you! 🙂

WordPress

New Web Design for the Twitter Homepage

Twitter is a real-time information network powered by people all around the world. Twitter is also referred to as a micro-blogging site. Twitter is probably the most preferred social media site to spread the news as it is fast and easy to use. You are limited to write 140 characters only which actually made twitter very popular.

New Web Design for the Twitter Homepage

Now, Twitter decided to have a new look. According to Twitter, “With the new design, we’re intentionally featuring more dynamic content on the front page, revealing a sample of who’s here, what folks are tweeting about, and the big topics that they’re discussing. The homepage now features a set of algorithmically-selected top tweets that automatically appear every few seconds. It also highlights a random sampling of suggested sources; hover over any of them to see a profile summary and their latest tweet. Trending topics now scroll across the page, allowing us to present a large set of trends using little page real estate. Hovering over some of these trends will show a description explaining why the keyword is (or has recently been) popular.”

The new look of the homepage did not bother me at all. I kind of like it actually. It is not intrusive. It is still easy to navigate and you get to have an overview of “what’s happening” with some of the people using twitter.

Twitter,Web Design

Upgraded to WordPress 2.9.2

I have upgraded all the websites and blogs from WordPress 2.9.1 to WordPress 2.9.2. The same blogs and sites that I upgraded to WordPress 2.9 and WordPress 2.9.1 from WordPress 2.8.6.

I upgraded the sites and blogs using the WordPress Automatic Upgrade feature and did not encounter any problems at all. The Image Gallery Problem has also been fixed the last time I upgraded the sites and blogs to WordPress 2.9 and WordPress 2.9.1.

Upgrading to WordPress 2.9.2 was not really necessary when it comes to the websites and blogs that I maintain but I opted to upgrade them anyway.

WordPress 2.9.2 was a fix release to a problem where logged in users can peek at trashed posts belonging to other authors. If you have other users registered on your blog and you do not like your posts being looked at despite being in the trash, upgrade your site or blog to WordPress 2.9.2.

You can download the new fix release of WordPress from the Download section or from the Release Archive section of WordPress.org.

Remember, before upgrading anything, back up your files and databases first. You can back up your files via FTP or File Transfer Protocol. You can back up your database via phpMyAdmin. Read my previous blog entry on how to back up database via phpMyAdmin.

Database,WordPress

How to back up Database via phpMyAdmin

Every time you update or upgrade your blog or website you are always being advised to back up your files and database.

You actually know how to upgrade your WordPress blog, for example, because of the WordPress Automatic Upgrade feature but you have no idea how to back up your database.

So, how would you back up your database?

There are several ways on how to back up your database but in this case I will show how to back up your MySQL database via phpMyAdmin.

How to back up MySQL Database via phpMyAdmin?

1. Locate your Databases or phpMyAdmin at the Control Panel of your account.

If you don’t know how to locate your database, read the following blog entries on how to locate MySQL Databases at the Control Panel.

How to locate Databases or phpMyAdmin at the PLESK Control Panel
How to locate Databases or phpMyAdmin at the H-SPHERE Control Panel
How to locate Databases or phpMyAdmin at the DREAMHOST Control Panel

Sometimes, you do not have to login at the Control Panel to login at the phpMyadmin.

But first, you need to find that link to your phpMyAdmin at the provided Control Panel.

2. Launch the phpMyAdmin from the Control Panel if you already found your Database or phpMyAdmin.

If you already know the link to your Database or phpMyAdmin, bookmark it for easy access.

Access the phpMyAdmin via the browser if you already know the link to your Database or phpMyAdmin.

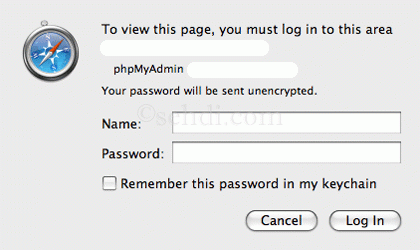
Once you launched the phpMyAdmin or accessed the phpMyAdmin via your browser you might be required to login.

How to backup Database via phpMyAdmin

How to backup Database via phpMyAdmin

3. Type your database username and database password if you will be required to login.

Please take note that the database username and password are different from your Control Panel username and password.

4. Click the Login button.

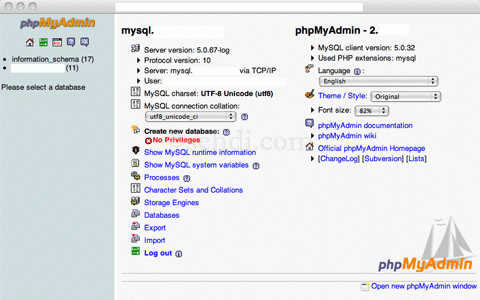
Once you clicked the Login button, you will be redirected to the main phpMyAdmin page.

How to backup Database via phpMyAdmin

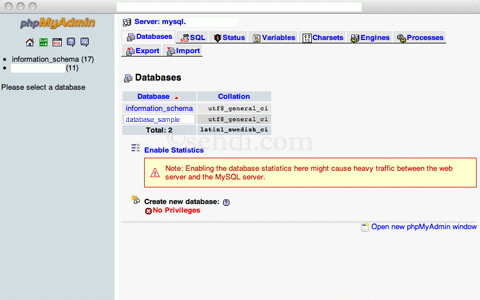
5. Click “Databases” to view your database or databases if you have more than one database.

You will be redirected to a new page where you will see your “Server:mysql” or “Server:localhost” depending on what the server is.

You will also see the menu type like Databases, SQL, Status, Variables, Charsets, Engines, Processes, Export, and Import.

You will see two columns namely the Database column and the Collation column.

How to backup Database via phpMyAdmin

I will not explain to you what those titles are all about but will only show you how to save or back up your database via phpMyAdmin.

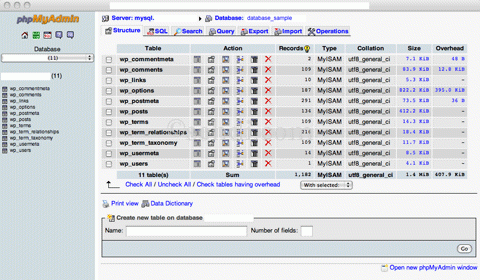
6. Click the appropriate database name, the “database_sample” that you would like to back up.

You will be redirected to another page showing you two important things “Server:localhost” or “Server:mysql” and “Database: database_sample” above the menu type like Status, SQL, Search, Query Export, Import, and Operations.

How to backup Database via phpMyAdmin

7. Click Export among the menu.

You will be redirected to another page.

8. Check SQL and Check Select All to save all the data in your database.

9. Check Add DROP TABLE if not checked.

10. Check Add IF NOT EXISTS if not checked.

At least the four options under Structure except and before Add CREATE PROCEDURE.

11. Check Data, Complete inserts, Extended inserts, Use delayed inserts except Use ignore inserts.

Export type is INSERT.

12. Check Save as file.

Leave the File name template as it is.

13. Check None as Compression to save the database as simple text.

14. Click Go on the bottom right side corner.

How to backup Database via phpMyAdmin

Wait for it until the database file was downloaded.

Once it was downloaded, the database file has a “.sql” file extension as you checked SQL.

15. Save the file to any folder you want.

That’s it.

Now you know how to back up your database via phpMyAdmin.

What else?

You have the option to save a zipped file or a gzipped file.

Check the zipped or gzipped as Compression and follow the same procedure.

Once it was downloaded, the database file has a “.sql.zip” file extension for zipped file after the database filename like “database_sample.sql.zip” and a “.sql.gz” file extension for gzipped file after the database filename like “database_sample.sql.gz”.

What else?

Before you do this, be very careful! I would not want you to lose your data just because your server is slow.

Uncheck Save as file, check None as Compression and click Go if you would like to see the database in text format without saving it.

This is just to show you how your database looks like.

Wait until everything is visible.

If you see the text, that’s it!

What else?

Click the database name “database_sample” at “Database: database_sample” to return to the previous window if you would like to backup the database.

Click Export again, and follow the same procedure from number 1 to number 15.

Again, that’s it.

WARNING:

Do not do anything other than what I wrote here. I said, do not do anything other than what I wrote here.

Be very careful when clicking the icons, especially the empty icon, drop icon and delete icon. If you make a mistake, your database might be gone in just a few seconds.

Database,PHP,phpMyAdmin

Upgraded to WordPress 2.9 “Carmen” to WordPress 2.9.1

WordPress 2.9 “Carmen” is another great WordPress release. WordPress 2.9 was released on December 19, 2009 but I never had the time to upgrade the blogs and sites before Christmas and even after the holidays. Then on January 4, 2009, WordPress 2.9.1 was released to address a handful of minor issues.

With the two releases, I just thought that it was time to upgrade. And so, yesterday, I upgraded the blogs and sites below from WordPress 2.8.6 to WordPress 2.9 “Carmen” to WordPress 2.9.1.

Sofie Hofmann dot com
Sofie Estolloso Hofmann Designs International
Pro Blog it | ProBlogging Venture Tips and Ideas, Reviews and Opinions
ISYU.INFO Around the World
Patria Diesel Power Plant Issue
Semirara Dumpsite Issue
Pandan Antique Philippines
Tugbong Festival
Weggis along Lake Lucerne Switzerland
PAGTATAP Foundation
Philippine Seafarers Assistance Programme
Leocadio Alonsagay Dioso Memorial Public Library

WordPress 2.9 introduced a lot of new great features like editing an image using the built-in image editor, updating the plugins in batches, embedding with oEmbed among others, but I have not really explored and tested them yet. I will not write about the new features. You can read all about them at WordPress.org or just watch the video below.

https://videopress.com/v/wp-content/plugins/video/flvplayer.swf?ver=1.15

There is one thing though that I would like to share to you. If you have been following my blog every time I upgraded to a new released version of WordPress you probably knew about my problem with the Image Gallery feature of WordPress and how I found a solution to it.

I was sort of not in the mood before to find out what was the real problem so I looked for a simple solution. But yesterday, I really looked for the problem and what I can actually do about it so I do not have to comment on the four lines at the post.php file every time there is a need to upgrade.

With one site for example, the “File URL” at the Media Library was different from the “guid” at the wp_posts at the database. You probably knew already that the “File URL” if you need to “Edit Media” at the Media Library cannot be edited from there. So I especially looked for that particular problem and found out that I can actually edit it at the wp_postmeta at the database.

I could actually use some SQL syntax but opted to edit them one by one as I did not want to take any chances that I might make a mistake and delete some things that I do not want to delete. I just removed the unnecessary folders and subfolders before the file name of the photos at the wp_postmeta at the database.

With another site, it was more of adding the year and month before the file name of the photos at the wp_postmeta at the database. The year and month were not reflected when I first uploaded the photos because the miscellaneous settings were different then from the one at the present.

I changed the settings at the miscellaneous by checking “Organize my uploads into month- and year-based folders”. When I first uploaded the photos, I did not check “Organize my uploads into month- and year-based folders”.

With what I just told you, I did not comment anymore on the four lines at the post.php under the wp-includes folder. Other than the Image Gallery problem, upgrading from WordPress 2.8.6 to WordPress 2.9 to WordPress 2.9.1 went fine.

WordPress

How to locate Databases or phpMyAdmin at the DREAMHOST Control Panel

I shared with you the steps on how to locate databases or phpMyAdmin at the PLESK control panel and the steps on how to locate databases or phpMyAdmin at the H-SPHERE control panel.

Now, let me share with you the steps on how to locate MySQL Databases and/or phpMyAdmin at the DreamHost Control Panel.

Login to your Control Panel…

1. Enter your Control Panel username at the Email Address or Web ID field.

2. Enter your Control Panel password at the Web Panel Password field.

3. Click Log In button.

How to locate Databases or phpMyAdmin at the DreamHost Control Panel

You will be redirected to the DreamHost Control Panel.

Welcome

Welcome to your DreamHost Control Panel!

This is the control center of your DreamHost account. From here you can configure literally any aspect of your account in no time at all!

4. Look for Databases.

If you see Databases…

5. Click the text Databases with the icon.

How to locate Databases or phpMyAdmin at the DreamHost Control Panel

You will be redirected to another page.

MySQL Databases

MySQL Database Management

Be sure to review the MySQL documentation in our wiki!
To access a database from the command line, use:…

You will also see the text Add New Hostname with 3 columns under it, the Hostname column, Web Administration column, and Actions column.

6. Click the text phpMyAdmin under the Web Administration column of the corresponding Hostname that you would like to access.

How to locate Databases or phpMyAdmin at the DreamHost Control Panel

And You will be redirected to the MySQL and phpMyAdmin page.

If you will be required to login…

7. Enter your database username at the Name field.

8. Enter your database password at the Password field.

9. Click Log in button.

And you will be redirected to the MySQL and phpMyAdmin page.

You are now at the MySQL and phpMyAdmin page.

Warning:

Do not do anything at the phpMyAdmin unless you know what you are doing.

Take note of all the icons especially the delete icon all the time.

One mistake and your database might be gone in just one click.

To see your database…

10. Click Databases, then Database name.

That’s it!

Now that you know the link to the phpMyAdmin, please bookmark it.

Sometimes, you do not have to login at the Control Panel to access the phpMyAdmin.

You can go directly to the phpMyAdmin.

Just enter your database username and database password to access your database.

Database,Dreamhost,MySQL,phpMyAdmin

Happy New Year 2010!

Happy New Year to everyone!

Happy New Year 2010!

Wishing you a very Prosperous New Year!

Wishing you all the best and success in 2010!

General,Picture Post

How to locate Databases or phpMyAdmin at the H-SPHERE Control Panel

Let me share with you the steps on how to locate MySQL Databases and/or phpMyAdmin at the H-SPHERE Control Panel.

Login to your Control Panel…

There are instances that H-SPHERE Control Panel looks like PLESK Control Panel.

Follow the instructions on how to locate databases and/or phpMyAdmin at the PLESK control panel.

1. Enter your Control Panel username at the Login field.

2. Enter your Control Panel password at the Password field.

3. Click Login button.

How to locate Databases or phpMyAdmin at the H-SPHERE Control Panel

You are now at the Account page. I am assuming that you only have one domain.

4. Look for Databases and phpMyAdmin.

If you see phpMyAdmin under Databases…

5. Click the phpMyAdmin icon.

How to locate Databases or phpMyAdmin at the H-SPHERE Control Panel

You will be redirected to another page where you will see the User column and Login column.

6. Select user to configure database via phpMyAdmin.

7. Click the Built in phpMyAdmin control panel icon under the Login column of the corresponding User.

And You will be redirected to the MySQL and phpMyAdmin page.

The page might be a pop-up window.

If you do not see the MySQL and phpMyadmin page, make sure that pop-up windows are not blocked.

8. Unblock the Pop-Up Windows.

9. Click the Built in phpMyAdmin control panel icon under the Login column of the corresponding User.

And you will be redirected to the MySQL and phpMyAdmin page.

If you will be required to login…

10. Enter your database username at the Name field.

11. Enter your database password at the Password field.

12. Click Log in button.

And you will be redirected to the MySQL and phpMyAdmin page.

You are now at the MySQL and phpMyAdmin page.

Warning:

Do not do anything at the phpMyAdmin unless you know what you are doing.

Take note of all the icons especially the delete icon all the time.

One mistake and your database might be gone in just one click.

To see your database…

13. Click Databases, then Database name.

That’s it!

Remember to block the pop-up windows later if you want it that way once you are finished looking at your database at the phpMyAdmin.

Also, now that you know the link to the phpMyAdmin, please bookmark it.

Sometimes, you do not have to login at the Control Panel to access the phpMyAdmin.

You can go directly to the phpMyAdmin.

Just enter your database username and database password to access your database.

Database,H-SPHERE,MySQL,phpMyAdmin