Every time you update or upgrade your blog or website you are always being advised to back up your files and database.
You actually know how to upgrade your WordPress blog, for example, because of the WordPress Automatic Upgrade feature but you have no idea how to back up your database.
So, how would you back up your database?
There are several ways on how to back up your database but in this case I will show how to back up your MySQL database via phpMyAdmin.
How to back up MySQL Database via phpMyAdmin?
1. Locate your Databases or phpMyAdmin at the Control Panel of your account.
If you don’t know how to locate your database, read the following blog entries on how to locate MySQL Databases at the Control Panel.
How to locate Databases or phpMyAdmin at the PLESK Control Panel
How to locate Databases or phpMyAdmin at the H-SPHERE Control Panel
How to locate Databases or phpMyAdmin at the DREAMHOST Control Panel
Sometimes, you do not have to login at the Control Panel to login at the phpMyadmin.
But first, you need to find that link to your phpMyAdmin at the provided Control Panel.
2. Launch the phpMyAdmin from the Control Panel if you already found your Database or phpMyAdmin.
If you already know the link to your Database or phpMyAdmin, bookmark it for easy access.
Access the phpMyAdmin via the browser if you already know the link to your Database or phpMyAdmin.
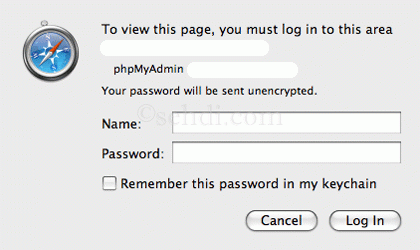
Once you launched the phpMyAdmin or accessed the phpMyAdmin via your browser you might be required to login.


3. Type your database username and database password if you will be required to login.
Please take note that the database username and password are different from your Control Panel username and password.
4. Click the Login button.
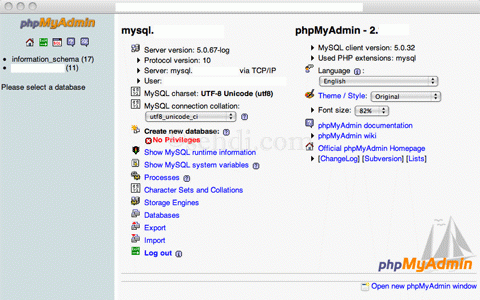
Once you clicked the Login button, you will be redirected to the main phpMyAdmin page.

5. Click “Databases” to view your database or databases if you have more than one database.
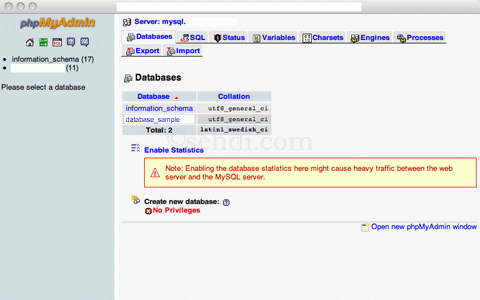
You will be redirected to a new page where you will see your “Server:mysql” or “Server:localhost” depending on what the server is.
You will also see the menu type like Databases, SQL, Status, Variables, Charsets, Engines, Processes, Export, and Import.
You will see two columns namely the Database column and the Collation column.

I will not explain to you what those titles are all about but will only show you how to save or back up your database via phpMyAdmin.
6. Click the appropriate database name, the “database_sample” that you would like to back up.
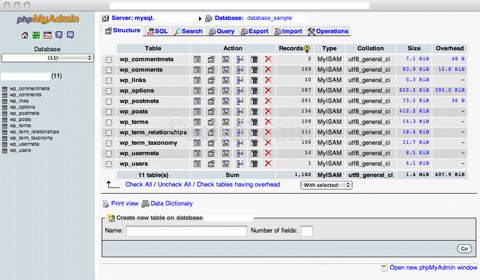
You will be redirected to another page showing you two important things “Server:localhost” or “Server:mysql” and “Database: database_sample” above the menu type like Status, SQL, Search, Query Export, Import, and Operations.

7. Click Export among the menu.
You will be redirected to another page.
8. Check SQL and Check Select All to save all the data in your database.
9. Check Add DROP TABLE if not checked.
10. Check Add IF NOT EXISTS if not checked.
At least the four options under Structure except and before Add CREATE PROCEDURE.
11. Check Data, Complete inserts, Extended inserts, Use delayed inserts except Use ignore inserts.
Export type is INSERT.
12. Check Save as file.
Leave the File name template as it is.
13. Check None as Compression to save the database as simple text.
14. Click Go on the bottom right side corner.

Wait for it until the database file was downloaded.
Once it was downloaded, the database file has a “.sql” file extension as you checked SQL.
15. Save the file to any folder you want.
That’s it.
Now you know how to back up your database via phpMyAdmin.
What else?
You have the option to save a zipped file or a gzipped file.
Check the zipped or gzipped as Compression and follow the same procedure.
Once it was downloaded, the database file has a “.sql.zip” file extension for zipped file after the database filename like “database_sample.sql.zip” and a “.sql.gz” file extension for gzipped file after the database filename like “database_sample.sql.gz”.
What else?
Before you do this, be very careful! I would not want you to lose your data just because your server is slow.
Uncheck Save as file, check None as Compression and click Go if you would like to see the database in text format without saving it.
This is just to show you how your database looks like.
Wait until everything is visible.
If you see the text, that’s it!
What else?
Click the database name “database_sample” at “Database: database_sample” to return to the previous window if you would like to backup the database.
Click Export again, and follow the same procedure from number 1 to number 15.
Again, that’s it.
WARNING:
Do not do anything other than what I wrote here. I said, do not do anything other than what I wrote here.
Be very careful when clicking the icons, especially the empty icon, drop icon and delete icon. If you make a mistake, your database might be gone in just a few seconds.


