How to Install WordPress, How to Set Up a Website

I have discussed topics like how to start a Website, how to register a domain name, how to get a web host, how to set up a Website, and how to set or change nameservers. Almost everything that have been discussed on those topics were required for a Website to be available online.

If you are determined to have a Website and you do not have any idea on how to design a Website, there are free publishing platforms out there which you can use. One of those easy to use publishing platforms as well as CMS Content Management System softwares is WordPress.

I will not discuss what is WordPress but I will give you an idea on how to install WordPress at DreamHost using its “One-Click Installs” feature.

How to Install WordPress at DreamHost

Proceed to DreamHost.

1. Supply the email address and password that you used when you signed up for a web hosting account with DreamHost at the “DreamHost: Login” page to log in at the web control panel.

Click the button “Login”.

You will be redirected to the “DreamHost Web Panel > Home : Welcome” page.

You will read the following text:

Welcome to your DreamHost Control Panel!

This is the control center of your DreamHost account. From here you can configure literally any aspect of your account in no time at all!

When you signed up, we automatically set up your first FTP user, your domain registration (if you so selected), your domain’s hosting with us, and your first email address (just to forward to your current email)!

If things aren’t working yet you may have to wait a day for the new DNS information to propagate across the whole Internet.

Now, you can go install in just one click some weblog software, a forum, a poll, an online store, or even a wiki!

How to Install WordPress, How to Set Up a Website

2. Click the link “One-Click Installs” on the left side under “Toolbox” above the “Main Menu” or click the link “Free Website Software” on the right side under “Let’s Get Started”.

You will be redirected to “DreamHost Web Panel > Goodies : One-Click Installs” page.

You will read the following text:

One-Click Software Installation

Fantastico, shmantastico! DreamHost now has its very own one-click software installation!

All software listed here has been judged best in its class by us, not to mention being open-source and completely free!

Unless you choose our “Easy mode,” you are also responsible for upgrading your old installations (you can do it from here!) should any critical security holes be discovered!

You have four (4) options:

Install new website software – Easy mode

Modify / remove previously installed software (easy)?

Install new website software – Advanced mode

Upgrade or remove previously installed software – Advanced mode

But since you are just going to install WordPress, you have two (2) options:

Either to Install new website software in easy mode or to install new website software in advanced mode.

DreamHost says:

“In easy mode, you cannot access the files for the installation (so you can only use the themes/plugins/languages we’ve included), but installation, upgrades, and maintenance are all handled for you!”

“In advanced mode, you have full control (the software is installed to your web space), but installation and maintenance is a tiny bit more involved.”

You can install WordPress in whatever mode you like but in my case as I would like to have full control, I always install WordPress in advanced mode.

How to Install WordPress, How to Set Up a Website

Well then, let us install WordPress in advanced mode.

3. Click the link “Install new website software – Advanced mode”.

You will be shown all the softwares that you can install and you will read the following text:

What software would you like to install?

How to Install WordPress, How to Set Up a Website

Install to:

Please be sure there are no files there now

Create a Database for me automatically: Uncheck this option if you want to create your database manually or use one of your existing databases.

Note: Submitting this form will set your domain to run PHP as a CGI if it isn’t already! (Which is probably fine!)

It should take less than 10 minutes to install your new software.
We will email you further instructions at (email address) when it’s complete

In this case:

4. Click WordPress.

5. Select the domain name at the dropdown menu corresponding to the text “Install to”.

For example your domain name is “sehdi.com” or “mysehdi.com”.

Select the domain “mysehdi.com” if you would like WordPress to be installed on that domain name.

You have the option to install it under the domain name “mysehdi.com” itself or at a folder.

You can write at the field provided next to the the domain name the folder like “mywp” or “wp”.

It would look like this:

Install to: http://www.mysehdi.com / mywp

How to Install WordPress, How to Set Up a Website

How to Install WordPress, How to Set Up a Website

How to Install WordPress, How to Set Up a Website

After that, there is a need to create a database.

Read “Create a Database for me automatically”.

You can leave it checked if you would like the database to be created for you automatically.

You can uncheck it if you would like to create your database manually or use one of your existing databases.

If for instance, you unchecked it.

You will be shown the following text and you need to fill out the blank fields provided:

Select a database to use:

New Database Name:
Try putting your domain name in front of your database name if the name you want is already taken.

Use Existing Hostname:

Create a New Hostname:
There is a delay while DNS propagates for new hostnames..(The domain must use our DNS!)

First User:

How to Install WordPress, How to Set Up a Website

In this case and if for instance you have no database yet:

Select “Create a database now” from the dropdown at the corresponding text “Select a database to use”.

You can write “mysehdidatabase” or “databasename1” at the field corresponding to the text “New Database Name”.

Select “Create a new hostname now” from the dropdown corresponding to the text “Use Existing Hostname”.

You can write “mysql” or “host” or myhost” or whatever you like at the field provided corresponding to the text “Create a New Hostname”.

Select the domain name “sehdi.com” or “mysehdi.com” that you already added before.

Adding the domain name was discussed on the topic how to set up a Website.

If for instance again, there is no existing username yet.

Select “Create a new user now” from the dropdown corresponding to the text “First User”.

Supply the necessary details at the blank fields provided.

New Username: databaseusername (example only)

New Password:

New Password Again:

But for example, we checked the box with the text “Uncheck this option if you want to create your database manually or use one of your existing databases” corresponding to the text “Create a Database for me automatically”.

With that, the database will be created for you automatically once you click the button “Install if for me now!”.

How to Install WordPress, How to Set Up a Website

6. Click “Install it for me now!”.

You will be redirected back to the “DreamHost Web Panel > Goodies : One-Click Installs” page.

You will again read the following text but with “Success” message:

One-Click Software Installation

Fantastico, shmantastico! DreamHost now has its very own one-click software installation!

All software listed here has been judged best in its class by us, not to mention being open-source and completely free!

Unless you choose our “Easy mode,” you are also responsible for upgrading your old installations (you can do it from here!) should any critical security holes be discovered!

We do not provide technical support for this software beyond the initial installation. For technical support, contact the software authors at the official sites linked below.

Read more in our Wiki!

Success!

WordPress will be installed to http://www.mysehdi.com/mywp/ within 10 minutes (using your databasename1 database).

You will then receive an email from us with final instructions to configure your new software.

Thanks,
The Happy DreamHost 1-Click Robot!

How to Install WordPress, How to Set Up a Website

But it does not end there.

Check if the installation was successful.

7. Check the link “http://www.mysehdi.com/mywp” at the browser.

You should be able to see a WordPress page.

You will read the following text:

Welcome

Welcome to the famous five minute WordPress installation process! You may want to browse the ReadMe documentation at your leisure. Otherwise, just fill in the information below and you’ll be on your way to using the most extendable and powerful personal publishing platform in the world.

Information Needed

Please provide the following information. Don’t worry, you can always change these settings later.

Site Title

Username

Password, twice

Your E-mail

How to Install WordPress, How to Set Up a Website

In this case:

8. Fill out the necessary details at the blank fields provided.

9. Click the button “Install WordPress”.

How to Install WordPress, How to Set Up a Website

You will be redirected to the “WordPress > Installation” page.

You will read the following text:

Success!

WordPress has been installed. were you expecting more steps? Sorry to disappoint.

Username username1

Password Your chosen password

The password will be sent to the email address that you provided.

How to Install WordPress, How to Set Up a Website

That’s it!

If you would like to check the WordPress installation, just click the button “Login”.

You will be redirected to the “Log In” page.

How to Install WordPress, How to Set Up a Website

Supply the username and password.

Click the button “Login”.

You will be redirected to the “Dashboard” of your WordPress installation.

How to Install WordPress, How to Set Up a Website

If you see the image like the one above, your WordPress installation was successful.

Congratulations!

Disclosure: Other than liking the features of DreamHost as a web host, I am also an affiliate of DreamHost. So, if you decide to sign up for a web hosting account with DreamHost using my referral link, I am going to earn from it.
Upgraded to WordPress 2.9.2

I have upgraded all the websites and blogs from WordPress 2.9.1 to WordPress 2.9.2. The same blogs and sites that I upgraded to WordPress 2.9 and WordPress 2.9.1 from WordPress 2.8.6.

I upgraded the sites and blogs using the WordPress Automatic Upgrade feature and did not encounter any problems at all. The Image Gallery Problem has also been fixed the last time I upgraded the sites and blogs to WordPress 2.9 and WordPress 2.9.1.

Upgrading to WordPress 2.9.2 was not really necessary when it comes to the websites and blogs that I maintain but I opted to upgrade them anyway.

WordPress 2.9.2 was a fix release to a problem where logged in users can peek at trashed posts belonging to other authors. If you have other users registered on your blog and you do not like your posts being looked at despite being in the trash, upgrade your site or blog to WordPress 2.9.2.

You can download the new fix release of WordPress from the Download section or from the Release Archive section of WordPress.org.

Remember, before upgrading anything, back up your files and databases first. You can back up your files via FTP or File Transfer Protocol. You can back up your database via phpMyAdmin. Read my previous blog entry on how to back up database via phpMyAdmin.

How to back up Database via phpMyAdmin

Every time you update or upgrade your blog or website you are always being advised to back up your files and database.

You actually know how to upgrade your WordPress blog, for example, because of the WordPress Automatic Upgrade feature but you have no idea how to back up your database.

So, how would you back up your database?

There are several ways on how to back up your database but in this case I will show how to back up your MySQL database via phpMyAdmin.

How to back up MySQL Database via phpMyAdmin?

1. Locate your Databases or phpMyAdmin at the Control Panel of your account.

If you don’t know how to locate your database, read the following blog entries on how to locate MySQL Databases at the Control Panel.

How to locate Databases or phpMyAdmin at the PLESK Control Panel
How to locate Databases or phpMyAdmin at the H-SPHERE Control Panel
How to locate Databases or phpMyAdmin at the DREAMHOST Control Panel

Sometimes, you do not have to login at the Control Panel to login at the phpMyadmin.

But first, you need to find that link to your phpMyAdmin at the provided Control Panel.

2. Launch the phpMyAdmin from the Control Panel if you already found your Database or phpMyAdmin.

If you already know the link to your Database or phpMyAdmin, bookmark it for easy access.

Access the phpMyAdmin via the browser if you already know the link to your Database or phpMyAdmin.

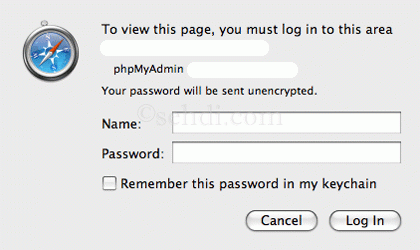
Once you launched the phpMyAdmin or accessed the phpMyAdmin via your browser you might be required to login.

How to backup Database via phpMyAdmin

How to backup Database via phpMyAdmin

3. Type your database username and database password if you will be required to login.

Please take note that the database username and password are different from your Control Panel username and password.

4. Click the Login button.

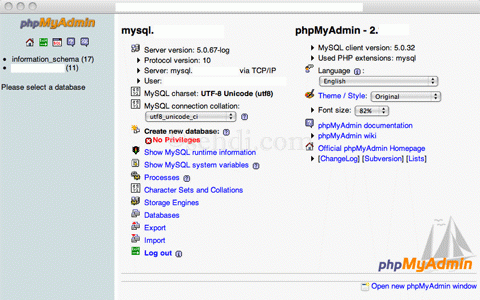
Once you clicked the Login button, you will be redirected to the main phpMyAdmin page.

How to backup Database via phpMyAdmin

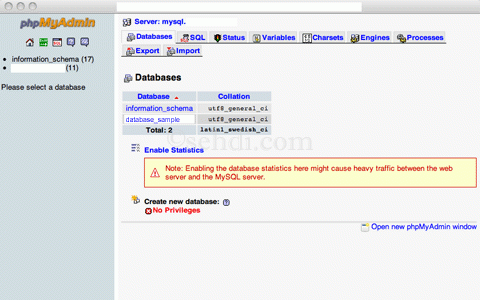
5. Click “Databases” to view your database or databases if you have more than one database.

You will be redirected to a new page where you will see your “Server:mysql” or “Server:localhost” depending on what the server is.

You will also see the menu type like Databases, SQL, Status, Variables, Charsets, Engines, Processes, Export, and Import.

You will see two columns namely the Database column and the Collation column.

How to backup Database via phpMyAdmin

I will not explain to you what those titles are all about but will only show you how to save or back up your database via phpMyAdmin.

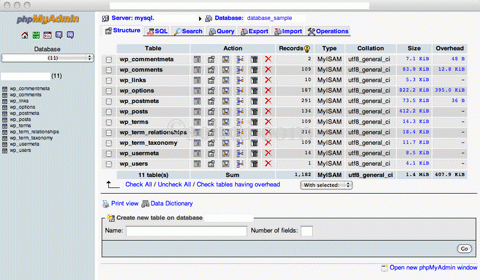
6. Click the appropriate database name, the “database_sample” that you would like to back up.

You will be redirected to another page showing you two important things “Server:localhost” or “Server:mysql” and “Database: database_sample” above the menu type like Status, SQL, Search, Query Export, Import, and Operations.

How to backup Database via phpMyAdmin

7. Click Export among the menu.

You will be redirected to another page.

8. Check SQL and Check Select All to save all the data in your database.

9. Check Add DROP TABLE if not checked.

10. Check Add IF NOT EXISTS if not checked.

At least the four options under Structure except and before Add CREATE PROCEDURE.

11. Check Data, Complete inserts, Extended inserts, Use delayed inserts except Use ignore inserts.

Export type is INSERT.

12. Check Save as file.

Leave the File name template as it is.

13. Check None as Compression to save the database as simple text.

14. Click Go on the bottom right side corner.

How to backup Database via phpMyAdmin

Wait for it until the database file was downloaded.

Once it was downloaded, the database file has a “.sql” file extension as you checked SQL.

15. Save the file to any folder you want.

That’s it.

Now you know how to back up your database via phpMyAdmin.

What else?

You have the option to save a zipped file or a gzipped file.

Check the zipped or gzipped as Compression and follow the same procedure.

Once it was downloaded, the database file has a “.sql.zip” file extension for zipped file after the database filename like “database_sample.sql.zip” and a “.sql.gz” file extension for gzipped file after the database filename like “database_sample.sql.gz”.

What else?

Before you do this, be very careful! I would not want you to lose your data just because your server is slow.

Uncheck Save as file, check None as Compression and click Go if you would like to see the database in text format without saving it.

This is just to show you how your database looks like.

Wait until everything is visible.

If you see the text, that’s it!

What else?

Click the database name “database_sample” at “Database: database_sample” to return to the previous window if you would like to backup the database.

Click Export again, and follow the same procedure from number 1 to number 15.

Again, that’s it.

WARNING:

Do not do anything other than what I wrote here. I said, do not do anything other than what I wrote here.

Be very careful when clicking the icons, especially the empty icon, drop icon and delete icon. If you make a mistake, your database might be gone in just a few seconds.

How to locate Databases or phpMyAdmin at the DREAMHOST Control Panel

I shared with you the steps on how to locate databases or phpMyAdmin at the PLESK control panel and the steps on how to locate databases or phpMyAdmin at the H-SPHERE control panel.

Now, let me share with you the steps on how to locate MySQL Databases and/or phpMyAdmin at the DreamHost Control Panel.

Login to your Control Panel…

1. Enter your Control Panel username at the Email Address or Web ID field.

2. Enter your Control Panel password at the Web Panel Password field.

3. Click Log In button.

How to locate Databases or phpMyAdmin at the DreamHost Control Panel

You will be redirected to the DreamHost Control Panel.

Welcome

Welcome to your DreamHost Control Panel!

This is the control center of your DreamHost account. From here you can configure literally any aspect of your account in no time at all!

4. Look for Databases.

If you see Databases…

5. Click the text Databases with the icon.

How to locate Databases or phpMyAdmin at the DreamHost Control Panel

You will be redirected to another page.

MySQL Databases

MySQL Database Management

Be sure to review the MySQL documentation in our wiki!
To access a database from the command line, use:…

You will also see the text Add New Hostname with 3 columns under it, the Hostname column, Web Administration column, and Actions column.

6. Click the text phpMyAdmin under the Web Administration column of the corresponding Hostname that you would like to access.

How to locate Databases or phpMyAdmin at the DreamHost Control Panel

And You will be redirected to the MySQL and phpMyAdmin page.

If you will be required to login…

7. Enter your database username at the Name field.

8. Enter your database password at the Password field.

9. Click Log in button.

And you will be redirected to the MySQL and phpMyAdmin page.

You are now at the MySQL and phpMyAdmin page.

Warning:

Do not do anything at the phpMyAdmin unless you know what you are doing.

Take note of all the icons especially the delete icon all the time.

One mistake and your database might be gone in just one click.

To see your database…

10. Click Databases, then Database name.

That’s it!

Now that you know the link to the phpMyAdmin, please bookmark it.

Sometimes, you do not have to login at the Control Panel to access the phpMyAdmin.

You can go directly to the phpMyAdmin.

Just enter your database username and database password to access your database.

How to locate Databases or phpMyAdmin at the H-SPHERE Control Panel

Let me share with you the steps on how to locate MySQL Databases and/or phpMyAdmin at the H-SPHERE Control Panel.

Login to your Control Panel…

There are instances that H-SPHERE Control Panel looks like PLESK Control Panel.

Follow the instructions on how to locate databases and/or phpMyAdmin at the PLESK control panel.

1. Enter your Control Panel username at the Login field.

2. Enter your Control Panel password at the Password field.

3. Click Login button.

How to locate Databases or phpMyAdmin at the H-SPHERE Control Panel

You are now at the Account page. I am assuming that you only have one domain.

4. Look for Databases and phpMyAdmin.

If you see phpMyAdmin under Databases…

5. Click the phpMyAdmin icon.

How to locate Databases or phpMyAdmin at the H-SPHERE Control Panel

You will be redirected to another page where you will see the User column and Login column.

6. Select user to configure database via phpMyAdmin.

7. Click the Built in phpMyAdmin control panel icon under the Login column of the corresponding User.

And You will be redirected to the MySQL and phpMyAdmin page.

The page might be a pop-up window.

If you do not see the MySQL and phpMyadmin page, make sure that pop-up windows are not blocked.

8. Unblock the Pop-Up Windows.

9. Click the Built in phpMyAdmin control panel icon under the Login column of the corresponding User.

And you will be redirected to the MySQL and phpMyAdmin page.

If you will be required to login…

10. Enter your database username at the Name field.

11. Enter your database password at the Password field.

12. Click Log in button.

And you will be redirected to the MySQL and phpMyAdmin page.

You are now at the MySQL and phpMyAdmin page.

Warning:

Do not do anything at the phpMyAdmin unless you know what you are doing.

Take note of all the icons especially the delete icon all the time.

One mistake and your database might be gone in just one click.

To see your database…

13. Click Databases, then Database name.

That’s it!

Remember to block the pop-up windows later if you want it that way once you are finished looking at your database at the phpMyAdmin.

Also, now that you know the link to the phpMyAdmin, please bookmark it.

Sometimes, you do not have to login at the Control Panel to access the phpMyAdmin.

You can go directly to the phpMyAdmin.

Just enter your database username and database password to access your database.

How to locate Databases or phpMyAdmin at the PLESK Control Panel

Let me share with you the steps on how to locate MySQL Databases and/or phpMyAdmin at the PLESK Control Panel.

Login to your Control Panel…

1. Enter your Control Panel username at the Login field.

2. Enter your Control Panel password at the Password field.

3. Click Login button.

How to locate Databases or phpMyAdmin at the PLESK Control Panel

4. Look for the domain name of the database you would like to locate.

5. Click the domain name of the database you would like to locate.

You will be redirected to another page where you will see the Databases icon.

5. Click the Databases icon.

How to locate Databases or phpMyAdmin at the PLESK Control Panel

You will be redirected to another page and you will see the Database name.

6. Click the Database name.

You will be redirected to another page and you will see the DB WebAdmin.

7. Click the DB WebAdmin icon.

And you will be redirected to the MySQL and phpMyAdmin page.

The page might be a pop-up window.

If you do not see the MySQL and phpMyadmin page, make sure that pop-up windows are not blocked.

8. Unblock the Pop-Up Windows.

9. Click the DB WebAdmin icon again.

And you will be redirected to the MySQL and phpMyAdmin page.

If you will be required to login…

10. Enter your database username at the Name field.

11. Enter your database password at the Password field.

12. Click Log in button.

And you will be redirected to the MySQL and phpMyAdmin page.

You are now at the MySQL and phpMyAdmin page.

Warning:

Do not do anything at the phpMyAdmin unless you know what you are doing.

Take note of all the icons especially the delete icon all the time.

One mistake and your database might be gone in just one click.

To see your database…

13. Click Databases, then Database name.

That’s it!

Remember to block the pop-up windows later if you want it that way once you are finished looking at your database at the phpMyAdmin.

Also, now that you know the link to the phpMyAdmin, please bookmark it.

Sometimes, you do not have to login at the Control Panel to access the phpMyAdmin.

You can go directly to the phpMyAdmin.

Just enter your database username and database password to access your database.

How to locate MySQL Databases or phpMyAdmin at the Control Panel

A lot of you have been blogging and writing for quite some time now but you have not saved any of your Databases.

You have no idea how to save your Databases because you have no idea where to locate your MySQL Databases.

I will try to give you some ideas on how to locate your MySQL Databases at the Control Panel.

I said I will try and wrote “ideas” because I do not know what Control Panel you are using.

I do not know if we have the same specifications even if we use the same Control Panel.

Nevertheless, whether the Control Panels are different from each other, you can still make use of the information to locate your MySQL Databases or phpMyAdmin.

I will not write yet on this blog entry the details on how to locate your MySQL Databases or phpMyadmin but in the next few days.

It will be a series then as I will write about it per Control Panel.

I have experiences using Dreamhost’s own Control Panel.

I have experiences using Yahoo’s own Control Panel.

I have experiences with Plesk Control Panel.

I have experiences with H-SPHERE Control Panel.

I used to have experiences with CPanel Control Panel but have not been using it for quite some time now.

If the Control Panel was not mentioned here, please write me your request using the comments section below.

I will try to write about the other Control Panels too if I can.